Thursday, July 15, 2010

A Sweet Summertime Treat of a Challenge

I finally entered my first scrapbooking challenge.  I always look at them online and think about doing it, but I decided to jump in this time.  I have to say it was a lot of fun.  It's a nice break from scrapbooking my day to day stuff.  It gets your creative juices flowing! The challenge was on Jinger Adam's, from Provo Crafts, Facebook page.  The challenge was to make a layout about enjoying summertime ice cream.  The most creative layout will win 10 of the newest Cricut cartridges!!!  How awesome of a giveaway is that?  So, here is what I created.

I used ALOT of cartridges for this layout!  The sun, the turtle, the frog, the grass, the tulips and the dragonflys are from Create a Critter.  I glittered the sun's background in yellow (surprise, surprise).  The dragonflys are hard to make out from a picture but close up they are really cute, I used vellum for their wings.  The clouds are from The Hello Kitty Greetings cartridge and I used my zig pen to outline the edges of the clouds and sprinkled them with silver glitter.  Because--every cloud has a silver lining right?  The kite is from Paper Dolls.  I cut it out in white paper and colored it with Smooches.  I had this idea to begin with of a little boy with a wagon full of ice cream.  It totally sounds like something one of my boys would do!  They love wagons, trailers, and anything that can be pulled with stuff in it.  They are always hauling stuff around!  I cut the kids, the wagon and the sign from Paper Dolls.  Also, I used my Peachy Keen stamps for the kids faces.  Love those stamps!  Here is a closeup of the sign by the little boy...
The sign says "Sweet treats to beat the heat 50 cents."  The mint chip cones and the vanilla cone with glitter is from Indie Art, the chocolate glitter cone and the white cone with sprinkles is from Paper Dolls, and the chocolate cone with a cherry is from Doodlecharms.  The little girl is also flying a kite...

I embossed her dress with the Cuttlebug Swiss Dots folder and of course I glittered her cone! :)  I used my Gypsy to weld a border from Just Because Cards and a square from Plantin Schoolbook.  The tree is from Just Because Cards.  I love that tree and I have to say it is the main reason I bought that cartridge.  There's nothing like a nice big tree to swing in !   This layout was super fun  to make and I have to say that I really liked entering the challenge.  It was really nice to take a breather from my pics.  Now I'm feeling inspired from all of the other entries I saw and I'm ready to get scrappin!

Sunday, July 11, 2010

Pink Valentine's Day Layout

I don't get to do pink layouts too often b/c I have two boys.  I think that's why I've started making cards, so I can do the glittery, flowery, cutesy stuff!  It is alot of fun.  I also think that's why I enjoy doing Valentine's Day layouts and Easter layouts.  I always have to bling them up somewhere on the page!  Have I mentioned how much I LOVE glitter?  I do, I do!  Anyways, here is the Valentine's Day layout I made for my son's preschool Valentine's Day party.  I just learned how to scan my pages and stitch them together using Photoshop--super, super easy!  So this is my first scanned page-yay!


I cut the heart out from the Doodlecharms cricut cartridge.  Doesn't it match the monsters heart perfectly!  Then I glittered the chipboard letters in red and pink.  I embossed the photo mats with the Cuttlebug folders "Conversations" and "Heart Blocks" and then I inked them.  I used a Martha Stewart edge punch on the pink strip in the middle  and used Versamark to stamp the fluttering heart image on it.  The background paper is from the Doodlin Around DCWV paper pack.  I think the little monster with a Valentine is very appropriate for a little boys Valentine page!  Have a great Sunday afternoon, I have been scrapbooking the day away!

Thursday, July 8, 2010

Keep it Simple...

Easier said than done!  With so many scrapbooking tools, glitters (my personal favorite), stamps, inks, stickers, brads, eyelets, flowers (with two boys I don't get to use those that often), punches, embossing folders, cricut cartridges, I could go on and on!  Sometimes it's really hard to keep it simple!  Although, as my pile of pictures that need to be scrapped gets larger and larger I'm telling myself that over and over again.  Keep it simple, keep it simple, keep it simple!  I'm getting so behind on my scrapbooking, I really need to get moving. And remember that resolution? Yeah...that's not going so good!  At this point in time I would like to officially change that to 1 page a week! :-)

So...while on the topic of keeping it simple I have a pretty simple page I did that describes my youngest to the T!  He's always getting into something he shouldn't and making messes.  Well on this particular day that I took this picture he was getting into a package of oreos while I was trying to finishing sewing up my curtains.  I didn't really care!  I was getting my sewing done, so I just went right ahead and let him make his mess! But what a cute mess he was...

Here is the title for the layout.  I can't remember what cartridge I used, sorry.
Using a needle and red embroidery floss I stitched the torn title to the layout.  Staying with the sewing theme, I thought this would be a great opportunity to use a cuttlebug folder from the 'Just My Type' border set.  So for my journaling I wanted to describe what a little messmaker he is...
Then for the border on the edge, I used a zig zagged ruler as a template and pierced the paper so I would have a guide for my stitching.  I then used a needle and red embroidery floss and stitched the zig zag border along the edge.  Here's how that turned out
Here is the finished layout.
It's a pretty simple page with nothing fancy.  I really like to do sewing, it gives it a little extra handmade touch!  I would really like to add a good mini sewing machine to my scrapbooking tools.  Anyone know of a good one?  Now, it's 11:30 and everyone is in bed.  I think I'm gonna watch some One Life to Live and do some scrapping.  And I'm gonna remind myself to keep it simple so I can make that pile of "pics to scrap" shorter!  Have a good night!

Wednesday, June 30, 2010

My Brown Eyed Boy

Here is a very simple page I created. It is one of my favorites because it is all about my son's beautiful brown eyes. I knew I wanted to do a monochromatic page with browns. I didn't have any cute brown buttons so my big sis let me dig through her HUGE button jar and I found this cute old buckle...


Then I found this perfectly brown big button...


Then of course the most important part of the page is this little boys beautiful brown eyes...


Then I did some layering with 3 dfferent colored brown papers from a Bazzill assortment of paper.  I tore the edges with my Creative Memories tearing tool.  I LOVE tearing.  I probably use it a little too much, or it seems like it ends up on almost all of my scrapbook pages anyways.  Anyways, this is what i came up with.  I'm all about journaling, but I didn't journal on this page.  I thought the title spoke for itself!  The title, by the way is from the Gypsy Font.  Thanks for looking!


Sorry for the delay

Ok, I really want to apologize here for the delay in my posts. I mean, practically half of the year has gone by!!! Sorry! I don't know what I have been doing, I just haven't felt motivated enough to upload anything. And sometimes I get discouraged after I see all of the beautiful work out there. I think "My stuff will never look that good". But, I have to remind myself why I started scrapbooking. The reason I started was to create memory albums to pass on to my children and to their children and so on. I can remeber sitting at my Grandma's house looking at her very very old black and white photos. I didn't know the people in the pictures but I knew that they were my history and I thought it was neat to look back at where I came from. I am going to get back on the wagon and I'm going to try my hardest to post here more often. I love doing crafts, especially scrapbooking b/c looking at pictures of my kids makes me happy and brings back those memories that we had while I took the pictures. I'm not going to worry about whether or not my pages are blogworthy or not I will just post my favorites and maybe we can create some relationships and share some ideas! Thanks for checking me out!

Tuesday, January 19, 2010

Rockin' Star Card


Here is a card I created using the brayer technique on glossy cardstock. I used a versamark stamp pad to randomly stamp a star image and then went over it with a brayer inked with red. Then, I randomly stamped a black star over that. I cut the star out with the Home Decor cricut cartridge and covered it in black glitter. Enjoy!

Monday, January 18, 2010

Sesame Street Pop-Up Birthday Invitation


Ok, here we go! For my first project to post I have decided to post the invitation I designed and made for my son's 2nd birthday party.

He LOVES Sesame Street and when I bought the Sesame Street Friends and Sesame Street Font cricut cartridges I had his party planned in my head already. I think his birthday was probably about 9 months away--maybe I just needed an excuse to buy the cartridges?? ;-)

This invite was also the first project I did on my new Gypsy!! I will give you step-by-step, detailed directions on how I made the invite.

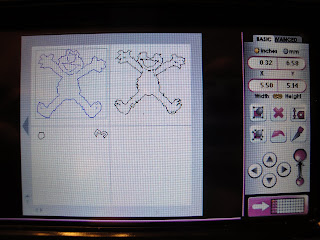
Step 1: First I "layed out" all of the parts to Big Bird on a 12x12 mat on the Gypsy screen. Big Bird and all of the parts were cut at a height of 10.23. All of the pieces will cut proportionately to each other. Example: If you cut Big Bird's body at 10.23 his eyes, tongue, etc will also need to be cut at 10.23 to fit his body correctly. If you don't own a Gypsy or Design Studio you could probably cut all of the pieces at 10 1/4 or 10" and it would probably fit just fine on the card. Just make sure you do not use the "Real Dial Size" button or you will really get eyeballs and other parts that are actually 10 1/4"!

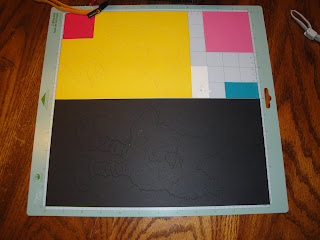
Then I layed out the paper to cut on the mat and cut the pieces out. It is much easier to load all the different colors for all the cuts and make all the cuts at the same time. You save so much time loading and unloading the mat. (Thanks for showing me this awesome time-saver Pink Stamper!)
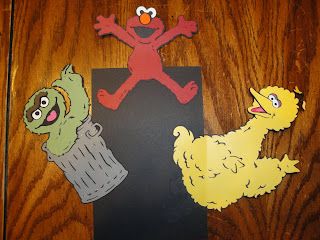
After the images were cut, I just put them together. The pieces you should have are Big Bird's background in black, body in yellow, tongue and eyelids in dark pink, eyes in white, smaller part of tongue in light pink, and eyelids in blue. Note: I threw away the pink parts to Big Birds legs because they will be hiding behind the card so I didn't want to mess with them.

Step 2: Next I moved on to the easy guy: Elmo! I did all of the same things as above on Big Bird, except he was cut at 5.14". I cut out a black background, red body, orange nose, and white eyes. He was much easier than Big Bird. Not so many pieces!! Put him together just as you did with Big Bird.

Step 3: Now onto a harder one: Oscar. Repeat all of the steps as above. I cut him at 6.26". He should have a black background, white eyes, green body, brown eyebrows, pink tongue, and grey trash can. The hardest thing about Oscar was cutting out the green body. His green fur was so intricate that my paper kept tearing. I tried everything but in the end, I opened a brand new mat and that helped.

Step 4: Cut out two pieces of black cardstock 5 1/2" x 8 1/2". On one of the pieces of black cardstock, tape down the three characters with part of their body hanging over the edge. You may have to experiment with this a bit before they fit right. You are going to want them to fold down without hanging over the edges of the card.

Step 5: Adhere the next piece of black cardstock on top of cardstock with characters. Making sure the edges align properly.

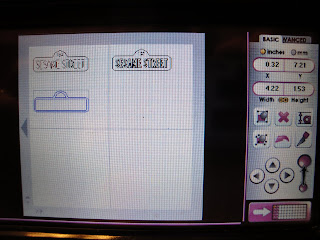
Step 6: Cut out Sesame Street Sign with the height set to 1.53". You will cut out the background in white, the sign in green, and the outside border in yellow. Adhere them together and apply them to the top of the card. Here is a screen shot of how I layed them out on the mat.


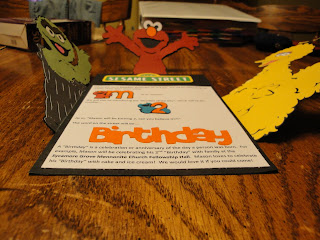
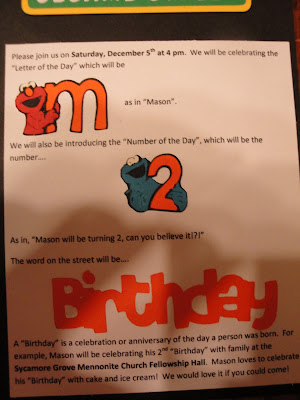
Step 7: I cut out the letter "M" for my son's name and the number "2" for his age. Then I welded the word "Birthday" together with my Gypsy. All of these items were cut at 1 inch. I put the pieces together and then typed out an invite. The invite I typed was mostly trial and error. I printed it out several times before I got the spacing right for the "M", "2", and "Birthday".


Step 8: Using a bone folder, fold the characters over the edges of the top black cardstock and lie them flat so the card can fit into an envelope. I used a greeting card envelope that is 5 3/4" x 8 3/4".


Phew!! That was a long one. I hope I explained it well enough and I'm sorry if I rambled on. For the birthday party I had planned on making party favors and decorations with these carts as well, but I am a procrastinator and I ran out of time!! Let me know if you have any comments or questions. Thanks for checking it out.